

.svg)
.svg)
.svg)
.svg)


August 12, 2014
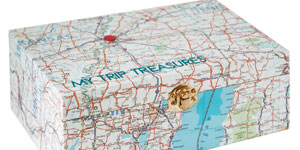
Filled with photos, postcards and treasures collected along the way, this colourful box will keep everything in one place. Show and tell, here I come.

You’ll Need:
1. Remove any hardware (hinges/ latches etc.) from box.
2. Place the top of the box flat side down on the back of the map. Trace the outer edges lightly in pencil. Then add the depth of the lid on all sides, plus another half centimetre (1/4 inch).
3. Cut piece from map as marked, notching out the corners. Crease along pencil lines.
4. Spread a thin layer of white glue on the back of the map. Set the lid within the creased area and press down. Apply glue to “flaps” and fold them over the lid.
5. Repeat with the bottom of the box. Replace hardware and reattach the lid.
6. Press lettering in position wherever you’d like on the outside of your covered box.
7. Push a thumbtack on to your finished box to mark your destination. (If the tack goes through and protrudes into the inside of the lid, for safety, bend and hammer the pointed end flat to hold the tack in place).
Originally published in ParentsCanada magazine, August/September 2014.
.svg)
.svg)
.svg)
.svg)
Website Powered by The Influence Agency 

.svg)
.svg)

